Connemara Catamarans
Infusion
Getting the infusion process to work has proved to be the most demanding part of the project to date and at times my series of failures with it almost drove me to despair. Before starting any work I had visited a boat in build (Tacoma cats in Seattle - Tom and Hugo were most helpful and their boat looked good). However while that build was the Kelsall flat panel method they were not using infusion. On reflection it would have been wise to visit another site where infusion was being used and better still to have seen the process being used on large panels.
The method works as follows:
Wax the table surface
Roll on a layer of gel coat. I would do this first thing in the morning so it would be ready for the next layer by about 10.00am.
Lay out the outside layers of glass.
Place the pre cut foam sheets next. Grooved at 25mm intervals (I modified a Skil saw to cut the grooves) and punctured through to facilitate resin flow.
Lay out the inside layers of glass.
Place spiral tubing for inlet/outlet resin flow. Initially I tried an inlet up the centre line and an outlet along each long edge. This gave a maximum span of about 1m for the resin to flow over.
Cover the whole with vacuum film and tape down the edges. For most of it I use packing tape, with tac-tape (a bit like blu-tac) for the corners and inlets/outlets.
Start the vacuum pumps. Check for leaks which usually takes at least half an hour.
Now everything is ready to start the infusion, it has proved just possible to get the set up done and infuse a large panel in a long day (7.00am to 8.00pm with luck).
To generate a vacuum am using a compressor linked to a Venturi. This is connected to a reservoir tank with vacuum gauge. From there a tube goes to the worktop. I initially started with a small compressor, one venturi and a custom made metal tank. It simply didnt give enough power and now have two compressors, a range of 3 venturis and reservoir tanks home built from sewer pipes. I run two vacuum systems in parallel and cycle the resin from inlet through to reservoir tank. The parallel system allows me to keep the vacuum running on one while I can disconnect the other and empty the reservoir tank to the inlet so that the resin can be recycled.
Another problem I encountered was with the resin flow on large panels. On a small panel everything would work fine, however when I came to do the large ones what would happen is the resin would flow quickly for the first 20-40 minutes, inusing perhaps 75%, then it would slow down exponentially so that after 3 hours it might stop moving altogether with a small area unfinished. I still do not understand why this is happening but suspect that once resin is flowing into the reservoir tank it may be finding an easier path round the edge of the panel rather than across it. I eventually found some resolution to this by laying down a third outlet spiral along the length of the panel one third of the way in and using that first, then the one on the edge.
One unfortunate consequence of the difficulties I had is that all four of may main panels have different amounts of resin on them and are thus not of equal stiffness.
Once everything was working I found it took about 6 working days from preparing the materials to cleaning up the panel and getting the table ready for the next one for a full length panel.
Home
Design
Model
Workshop and Table
Infusion
Assembling Hulls
Hull Bulkheads
Bridgedeck Floor
Superstructure
Completing shell
Interior
Cost and Time Estimates
Suppliers
LInks
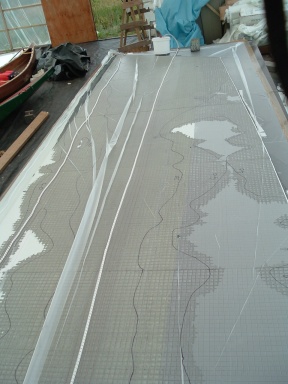
Hull panel during infusion.
Inlet spiral down the centre with inlet pot of resin at the far end.
Outlet spirals down both edges and a third one in from the left edge.
The flow lines are marked and the white areas are still to be infused.

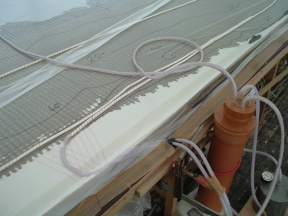
Showing an outlet point in the middle of one of the long sides.
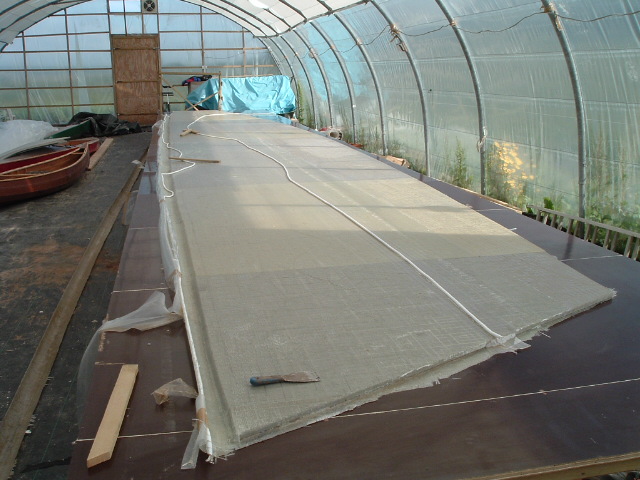
A finished panel with the vacuum film removed.
The outlet on the other side with the deck edge radius.
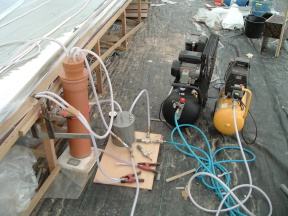
Two compressors linked up to one tank. The grey metal tank is simply being used for the vacuum gauge.
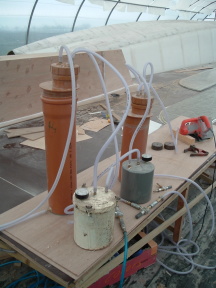
My current system. The metal tanks were what I originally had made and are simply being used to mount the vacuum gauges. The sewer pipe tanks have outlet pipes at the bottom to empty the resin out.
The three venturis are all different sizes which is useful and can be interchanged at ease.
The Skil saw is my grooving tool and has 4 small circular plades mounted in parallel - thanks for the idea Tom !